20 Chicken Coop Designs – Ideas, Plans & Layout Tips

Backyard homesteading is a rewarding way to reclaim your connection to nature and produce your own food, even in limited spaces. Whether you’re a seasoned gardener or just starting your self-sufficiency journey, the right chicken coop design can make all the difference in raising healthy, happy chickens.
Building a chicken coop doesn’t require advanced carpentry skills or expensive materials; with a few basic tools and a little creativity, anyone can create a functional and aesthetically pleasing home for their feathered friends.
Many of the best homestead chicken coop designs can be adapted to fit your specific yard size and style preferences, allowing you to integrate them seamlessly into your existing landscape. These setups not only provide shelter for your chickens but also contribute to the overall sustainability of your homestead.
From utilizing reclaimed materials to incorporating companion gardening principles, the possibilities are endless. Let’s explore a variety of chicken coop designs that can inspire your backyard project.
1. Homesteading Project 1: Reclaimed Wood Chicken Coop


This charming chicken coop design made from reclaimed wood brings a rustic touch to any suburban backyard. With a slanted roof for effective rain runoff, this coop ensures that your chickens stay dry and comfortable.
The small run area allows your Buff Orpington hens to dust bathe in the morning sun, promoting their natural behaviors and keeping them healthy. To build this coop, you’ll need untreated reclaimed wood, screws, hinges for the door, and a few basic tools such as a saw and drill.
Consider positioning the coop in a sunny spot with good drainage to prevent water pooling. The dimensions can be tailored to the number of chickens you plan to keep; a 4’x8’ footprint is adequate for 4-6 chickens.
Adding ventilation through small windows or mesh will help regulate temperature during the summer months. This coop design not only provides a cozy home for your chickens but also helps reduce waste by repurposing materials.
To maintain a sustainable environment, consider using straw or grass clippings as bedding in the coop and run. This not only provides comfort for the hens but also breaks down over time to enrich your garden soil.
Regularly cleaning the coop and providing fresh bedding will help prevent disease and keep your flock thriving.
- Use reclaimed wood from local sources to minimize costs and reduce waste.
- Ensure the coop is elevated slightly off the ground to prevent moisture damage.
- Incorporate a small herb garden near the coop to provide fresh greens for your hens.
- Document your building process and progress with photos to share your journey online.
- Involve family members in the construction for a fun bonding activity.


2. Homesteading Project 2: Compact Urban Chicken Coop


For those with limited space, this compact chicken coop design fits perfectly in a small urban backyard. Featuring a vertical garden on one side, this coop not only houses your Barred Plymouth Rock hens but also maximizes your growing potential.
The vertical garden can be filled with herbs and greens, creating a lush environment that benefits both your chickens and your culinary endeavors.
This coop can be constructed using lightweight materials like plywood for the walls and a simple frame for the roof. Ensure that the coop is well-ventilated, especially in warmer months, as urban settings can trap heat.
A run made from chicken wire will allow your hens to safely forage while keeping them protected from predators. This setup should measure around 3’x6’ to comfortably accommodate up to 4 hens.
Incorporating climbing plants in your vertical garden not only provides food for you but also gives your hens some shade and enrichment as they explore their surroundings. Keeping a close eye on the health of your chickens and the plants will help you maintain a balanced ecosystem right in your backyard.
- Choose lightweight materials for easy mobility and adaptability in your space.
- Utilize a drip irrigation system for the vertical garden to conserve water.
- Make the coop easy to clean by designing it with removable trays.
- Regularly check for signs of pests in both the coop and garden.
- Share your progress on social media to connect with other urban homesteaders.


3. Homesteading Project 3: Green Roof Chicken Coop


This innovative chicken coop design incorporates a green roof, blending seamlessly into a rural homestead. Surrounded by a picket fence, the coop provides a safe haven for your Rhode Island Red hens while also showcasing your commitment to sustainability.
The green roof not only provides insulation but also creates a habitat for beneficial insects and contributes to rainwater absorption.
You can construct this coop using sturdy framing materials like treated lumber for the structure, with a waterproof membrane to support the soil and plants on the roof. The run should be spacious enough for your hens to move freely, and the fence should be high enough to deter any predators.
A size of 5’x10’ is recommended for a small flock of 6-8 chickens.
To create the green roof, choose low-maintenance plants like sedums or native grasses that thrive in your climate. This not only beautifies the coop but also provides additional insulation during winter months and cooling in the summer.
Regular maintenance of both the roof and the coop will ensure a thriving environment for your hens for years to come.
- Use lightweight soil for the green roof to avoid stressing the coop’s structure.
- Incorporate drainage layers to prevent water accumulation on the roof.
- Rotate the chickens’ feeding area to prevent overgrazing and maintain healthy vegetation.
- Consider adding a rainwater collection system to support the green roof watering.
- Document the growth of your green roof and share updates with your community.


4. Homesteading Project 4: Well-Organized Chicken Coop


This well-organized chicken coop design features a sliding door for easy access and a fenced run with scattered straw for comfort. With Leghorn hens pecking at the ground, this coop ensures that your chickens have plenty of space to roam and forage.
Building this type of coop requires materials like plywood for the walls, hardware cloth for the run, and basic carpentry tools.
The coop’s structure should be designed to provide ample ventilation and sunlight while protecting against harsh weather. A footprint of 6’x8’ is ideal for housing 5-7 hens.
The sliding door provides convenient access for feeding, cleaning, and egg collection, making daily chores more manageable.
Scattering straw or wood chips in the run helps absorb moisture and provides a comfortable surface for your hens as they scratch and play. Regularly rotating the run area will prevent overgrazing and allow the ground to recover, promoting a healthier environment for your chickens.
- Ensure the coop has windows that can be opened for airflow during hot weather.
- Use durable materials that can withstand the elements and require minimal maintenance.
- Incorporate nesting boxes that are easily accessible for egg collection.
- Develop a cleaning schedule to keep the coop sanitary and your hens healthy.
- Share your design and experiences with local homesteading groups for inspiration.


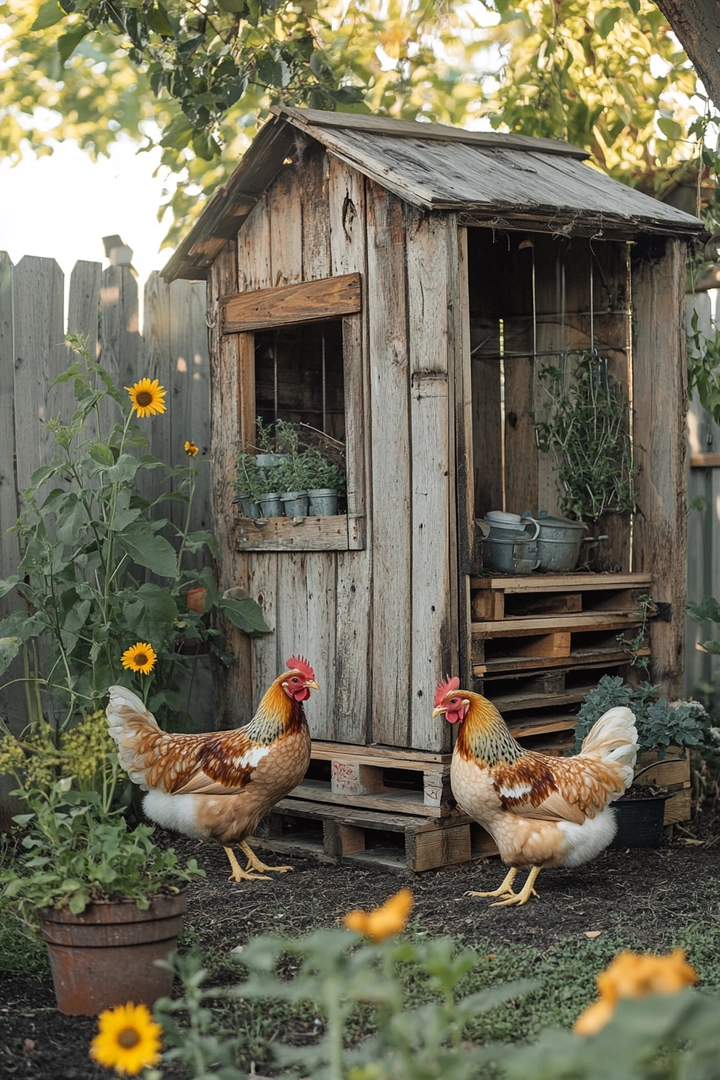
5. Homesteading Project 5: Rustic Pallet Chicken Coop


This rustic chicken coop design built from pallets is an affordable and eco-friendly option for any backyard. Positioned under a large oak tree, this coop provides ample shade for your Silkie hens while blending beautifully into the garden landscape.
Building with pallets minimizes costs and allows for quick assembly, making it a perfect project for beginners.
To construct this coop, you’ll need to disassemble the pallets and reassemble them to create walls and a roof. Adding a small window for ventilation will help regulate temperature.
A size of 4’x6’ is appropriate for housing 3-5 hens comfortably. The run can be made from chicken wire or welded wire fencing to keep your flock safe from predators.
Consider using an easy-access door for feeding and cleaning, and be sure to secure the coop to prevent any unwanted intrusions. The natural aesthetic of this design not only provides shelter for your chickens but also enhances the beauty of your backyard garden.
- Look for free or low-cost pallets from local businesses or warehouses.
- Inspect pallets for any signs of damage or chemicals before using them.
- Incorporate natural landscaping elements to enhance the coop’s aesthetic appeal.
- Regularly check for loose nails or sharp edges on the pallet wood.
- Document your project’s progress to inspire others to embrace upcycling.
6. Homesteading Project 6: Corrugated Metal Chicken Coop


This DIY chicken coop design made from corrugated metal offers a modern aesthetic while providing durability and weather resistance. Placed in a sunny corner of your suburban yard, this is not only functional chicken coop but also visually appealing.
With Australorp hens foraging in the small pen, this design creates a lively atmosphere in your backyard.
Constructing this coop requires straightforward materials, including corrugated metal sheets for the walls and roof, plywood for the floor, and a sturdy frame for support. A size of 5’x7’ is ideal for accommodating 4-6 chickens comfortably.
Ensure that the coop has sufficient ventilation to prevent heat buildup during summer months.
The metal exterior provides excellent protection from the elements, while the pen allows your hens to safely enjoy the outdoors. Regularly check for any signs of rust or wear, and maintain the coop to keep it in good condition for years of use.
- Choose rust-resistant corrugated metal for long-lasting durability.
- Include a shaded area in the pen to provide relief on hot days.
- Install a simple rainwater collection system to provide fresh water for your hens.
- Utilize non-toxic paint to add color and personality to the coop.
- Document your build process to inspire others interested in modern designs.


7. Homesteading Project 7: Elegant Picket Fence Chicken Coop


This elegant chicken coop design features a white picket fence and a small flower garden in front, creating a picturesque setting in your quaint suburban backyard. With Plymouth Rock hens pecking at the grass, this coop design not only serves as a home for your chickens but also enhances your outdoor space.
To create this coop, use treated wood for the frame and picket fencing, ensuring it is sturdy enough to withstand the elements. A size of 4’x8’ will comfortably house up to 6 hens.
The flower garden can be filled with companion plants that deter pests while providing beauty and additional food sources for your flock.
Consider integrating a small ramp that leads to the coop entrance, allowing your hens easy access. Regularly check the fencing for any weak spots and maintain the garden to ensure a vibrant and healthy environment.
- Choose low-maintenance flowers that can thrive alongside your chickens.
- Ensure that the fence is tall enough to keep out any potential predators.
- Incorporate a small compost area for chicken waste to enrich your garden soil.
- Regularly rotate the chickens’ grazing area to promote healthy grass growth.
- Share your project updates on gardening blogs or social media for inspiration.


8. Homesteading Project 8: Hinged Roof Chicken Coop


This practical chicken coop design features a hinged roof for easy cleaning, located at the edge of a rural homestead. By housing a few Golden Comet hens nestled in fresh straw, this setup exemplifies simplicity and efficiency in backyard chicken keeping.
Building this coop can be accomplished with basic carpentry skills and materials like plywood and 2x4s.
Construct the coop with a size of 5’x6’ to accommodate 4-5 hens comfortably. The hinged roof allows for simple access to the interior for cleaning and maintenance, while the run should be spacious enough for the hens to forage.
Using straw as bedding provides insulation and comfort for the chickens.
Make sure to incorporate ventilation to ensure good airflow, especially during warmer months. This design not only prioritizes the health and comfort of your flock but also simplifies your daily chores.
- Plan the hinge mechanism for the roof carefully to ensure smooth operation.
- Use straw or wood shavings as bedding to provide comfort and absorb moisture.
- Ensure that the run area is secure to protect against predators.
- Regularly check the roof hinges for wear and tear to maintain functionality.
- Share the benefits of easy access with fellow homesteaders to inspire their designs.
- Incorporate vibrant colors and fun designs to enhance the cottage aesthetic.
- Use durable materials that can withstand the elements while maintaining character.
- Include a small water feature or birdbath nearby to attract more wildlife.
- Regularly maintain the landscaping to keep the area inviting and functional.
- Document your creative process to share with others who appreciate unique designs.
- Inspect the shed for any repairs needed before converting it into a coop.
- Use non-toxic materials for any modifications to ensure the safety of your flock.
- Incorporate a composting area for chicken waste to enrich your garden soil.
- Regularly clean the shed to prevent any buildup of waste or pests.
- Share your before-and-after photos to inspire others to repurpose materials.
- Choose materials that are both durable and visually appealing.
- Incorporate native plants in the run for a sustainable and natural environment.
- Ensure the coop is secure from predators common in urban areas.
- Regularly inspect and maintain the ramp to prevent wear and tear.
- Document your construction journey to encourage others interested in urban farming.


9. Homesteading Project 9: Whimsical Cottage-Shaped Chicken Coop


This whimsical chicken coop design, shaped like a cottage, adds a playful element to your flower-filled backyard. With a small porch and a couple of friendly hens lounging nearby, this coop creates a charming atmosphere while providing a safe home for your chickens.
To build this unique coop, you’ll need basic construction materials such as plywood, shingles for the roof, and wooden beams for framing.
The design can be tailored to fit a size of 4’x8’ to house 4-6 hens comfortably. Ensure ample ventilation and natural light by incorporating windows that can be opened.
The cottage shape not only adds character but also provides excellent insulation, keeping your flock comfortable year-round.
Consider landscaping around the coop with native flowers and plants that attract beneficial insects and pollinators. This not only beautifies your space but also creates a sustainable habitat for various wildlife.


10. Homesteading Project 10: Repurposed Shed Chicken Coop


This repurposed chicken coop design transforms an old shed into a functional and stylish home for your flock. Surrounded by a vegetable garden in a suburban backyard, this setup exemplifies the principles of sustainability and resourcefulness.
Modifying an existing structure not only saves money but also reduces waste, making it an excellent choice for budget-conscious homesteaders.
To adapt the shed for chickens, ensure that it has proper ventilation and insulation, particularly if you live in an area with extreme temperatures. A size of 5’x7’ is suitable for housing 4-5 hens comfortably.
Adding windows and a secure run will keep your hens safe and happy while allowing them to enjoy the outdoors.
Consider using the shed’s existing structure to your advantage, perhaps converting shelves into nesting boxes or utilizing the space for storage of feed and supplies. This practical design not only serves your chickens well but also integrates seamlessly into your existing garden layout.


11. Homesteading Project 11: Modern Urban Chicken Coop


This modern chicken coop design features a sliding door and a small ramp, perfect for vibrant urban backyards. The coop includes a run filled with native grasses, providing a natural environment for your Bantam hens.
Building this coop requires basic construction skills and materials such as wood, chicken wire, and hinges.
A size of 4’x6’ is suitable for 3-4 Bantam chickens, ensuring they have enough space to move comfortably. The sliding door simplifies access for feeding and cleaning, while the ramp allows your chickens to enter and exit the coop with ease.
Incorporating natural grasses not only enriches their diet but also creates a more aesthetically pleasing environment.
Regular maintenance of both the coop and the run will keep your flock healthy and happy. This modern design can also inspire creativity in other urban farmers, showcasing how functional spaces can be beautifully integrated into city living.


12. Homesteading Project 12: Simple Wire Mesh and Wood Chicken Coop


This simple chicken coop design utilizes wire mesh and wood, positioned in a shaded area of a suburban yard. The coop houses a couple of hens that appear to be preening, showcasing the importance of comfort in their living environment.
Building this type of coop requires minimal materials, making it a great project for beginners.
A size of 4’x5’ is perfect for 2-3 hens, providing enough space for them to roam. The wire mesh allows for ample ventilation while keeping your chickens safe from predators.
Use untreated wood for the frame and ensure that the coop is elevated slightly to prevent moisture damage.
Regularly check the wire mesh for any signs of wear or damage, and maintain a clean environment inside the coop to promote healthy living conditions for your hens. This simple and effective design can be a great introduction to chicken keeping for those new to homesteading.
- Use non-treated wood to avoid exposing chickens to harmful chemicals.
- Ensure the wire mesh is securely fastened to prevent escapes and protect against predators.
- Incorporate shaded areas in the run for hot days, providing relief for your hens.
- Regularly clean the coop to maintain a healthy living environment.
- Document your experience to inspire others new to chicken keeping.


13. Homesteading Project 13: A-Frame Chicken Coop


This charming A-frame chicken coop design is perfect for small backyards, snugly fitting among herbs and flowers. With a few hens foraging for insects, this coop not only provides shelter but also complements your garden’s beauty.
Constructing this coop requires simple materials like plywood and 2x4s, making it accessible for beginners.
A size of 4’x6’ will comfortably house 3-4 hens, while the A-frame shape helps with rain runoff and provides good natural ventilation. The design can be enhanced with windows and a small door for easy access.
Positioning the coop in a sunny area will promote a healthy environment for your flock, while the surrounding plants benefit from chicken droppings as natural fertilizer.
Regularly check for any signs of wear and tear, and maintain the coop to ensure longevity. This design not only creates a cozy home for your chickens but also adds a whimsical touch to your garden.
- Ensure the coop is elevated slightly to prevent moisture buildup.
- Incorporate easy-access nesting boxes that can be reached from the outside.
- Regularly rotate the location of the coop to promote healthy grass growth.
- Share your build process to inspire others interested in small-space chicken keeping.
- Document the benefits of having chickens in your garden for others to see.


14. Homesteading Project 14: Practical Nesting Box Chicken Coop


This practical chicken coop design features a nesting box accessible from outside, set in a modest rural backyard. With Red Ranger hens exploring the grassy area, this coop ensures that your chickens have adequate space to roam while simplifying egg collection.
Constructing this coop involves using basic building materials such as wood and wire mesh, making it a feasible project for many homeowners.
A size of 5’x8’ is suitable for 5-6 hens, allowing them to comfortably move around. The external nesting boxes promote easy egg retrieval, minimizing disturbances to your hens.
Incorporate ventilation through small windows or vents to ensure airflow and comfort, especially during hot weather.
Maintaining cleanliness in the coop and run will help prevent disease and keep your flock healthy. This practical setup not only serves the needs of your chickens but also makes daily chores easier for you.
- Ensure the nesting boxes are insulated to keep eggs from freezing in winter.
- Regularly clean the coop to prevent odors and health issues.
- Incorporate a small run that is secure from predators.
- Share your design with local homesteading groups for feedback and inspiration.
- Document your egg-laying process to share the joys of chicken keeping.


15. Homesteading Project 15: Colorful Mural Chicken Coop


This eye-catching chicken coop design features a colorful mural on the side, brightening up any vibrant urban garden. With a small run where a few Orpington hens scratch the ground, this setup showcases how functionality and aesthetics can coexist.
Constructing this coop requires basic materials and tools, making it achievable for many aspiring homesteaders.
A size of 4’x6’ will comfortably house 3-4 hens, while the mural adds a personal touch and enhances the visual appeal of your garden. Ensure proper ventilation and include a shaded area in the run to keep your hens comfortable during hot days.
The coop can be painted with non-toxic, weather-resistant paint to ensure longevity.
Regularly check the coop for any signs of wear or damage, and maintain the mural to keep it looking vibrant. This design not only provides a home for your chickens but also makes a statement in your outdoor space.
- Choose non-toxic paints to ensure the safety of your flock.
- Incorporate native plants around the coop for added beauty and sustainability.
- Regularly maintain the mural to keep the visual appeal intact.
- Document your creative process to inspire others to embrace artistic designs.
- Share your coop’s design on social media to connect with fellow chicken enthusiasts.
16. Homesteading Project 16: Movable Chicken Coop


This compact chicken coop design features a movable run, allowing you to easily relocate it to fresh grass and new areas of your yard. With a few hens enjoying the fresh grass, this design promotes a sustainable approach to chicken keeping by allowing your flock to naturally forage.
Building this coop requires basic materials and tools, making it accessible for beginners.
A size of 4’x5’ is ideal for 2-3 hens, while the movable design ensures that they have access to fresh grass and insects. The coop should include proper ventilation and shade to keep your hens comfortable.
Consider using lightweight materials for easy transportation, such as PVC pipes for the frame.
Regularly moving the coop will help maintain healthy grass and prevent overgrazing. This practical design not only benefits your chickens but also promotes a sustainable backyard ecosystem.
- Ensure the coop is lightweight for easy movement without straining.
- Incorporate a simple locking mechanism to secure the coop during transport.
- Regularly check for signs of wear and tear on the movable parts.
- Share your experiences with movable coops to inspire others to try this method.
- Document the benefits of rotational grazing for your hens’ health.
17. Homesteading Project 17: Cozy Thatched Roof Chicken Coop


This cozy chicken coop design features a thatched roof, providing both insulation and charm to a garden filled with vegetables and flowers. With a couple of hens lounging in the sun, this setup creates a peaceful environment for both chickens and gardeners.
Constructing this coop requires more advanced skills and materials, making it an exciting project for those with some building experience.
A size of 5’x7’ is suitable for 4-5 hens, with the thatched roof offering excellent insulation for both hot and cold weather. Ensure proper ventilation and consider using natural materials for the frame to enhance the rustic aesthetic.
Regularly inspecting the thatching will help maintain the coop’s integrity over time.
Positioning the coop in a sunny area will allow your hens to enjoy the warmth while providing a picturesque view in your garden. This design not only serves a functional purpose but also adds beauty to your outdoor space.
- Utilize local materials for the thatched roof to reduce costs and support local businesses.
- Ensure the coop is well-ventilated to promote a healthy environment for your hens.
- Regularly check the thatching for any signs of wear or damage.
- Share your creative process and design details with fellow homesteaders.
- Document the benefits of using natural building materials for sustainability.


18. Homesteading Project 18: Rustic Weathered Wood Chicken Coop


This rustic chicken coop design made from weathered wood complements the surrounding wildflowers in a rural backyard. With a few hens scratching the ground, this setup captures the essence of sustainable living.
Building this coop requires basic carpentry skills and materials such as reclaimed wood and nails, making it accessible for many homesteaders.
A size of 5’x8’ is suitable for housing 5-6 hens comfortably. The weathered wood not only provides character but also durability, ensuring that the coop can withstand the elements.
Incorporate ventilation and small windows to allow for natural light and airflow.
Regular maintenance, including checks for any loose boards or signs of rot, will help prolong the life of the coop. This design embodies the spirit of rustic charm while serving the practical needs of your chickens.
- Use wood from local sources to reduce costs and support sustainability.
- Incorporate natural landscaping elements around the coop for visual appeal.
- Ensure proper ventilation to keep your hens cool and healthy.
- Document your project to inspire others interested in rustic designs.
- Share the benefits of using reclaimed materials in your local community.


19. Homesteading Project 19: Flower-Filled Urban Chicken Coop


This charming chicken coop design with a small porch is nestled in a flower-filled urban yard, creating a vibrant atmosphere. With a couple of hens perched on the coop’s edge, this design showcases how urban spaces can beautifully accommodate chickens.
Constructing this coop requires basic materials and tools, making it a great option for urban homesteaders.
A size of 4’x6’ is appropriate for 3-4 hens, providing enough space for them to move comfortably. The coop should include proper ventilation and access to natural light, ensuring a healthy environment for your flock.
The surrounding flower garden not only enhances the beauty of your backyard but also provides natural food sources for your chickens.
Regularly check the coop for signs of wear and maintain the flower garden to ensure a vibrant and healthy environment. This design not only serves as a home for your chickens but also beautifies your urban landscape.
- Choose low-maintenance flowers that complement the coop’s design.
- Include natural barriers around the coop to protect against pests.
- Regularly inspect the coop for any signs of damage or wear.
- Document your chicken keeping journey to inspire others in urban settings.
- Share your design and experiences on gardening forums for feedback.
- Choose sturdy materials for the ramp to ensure durability and safety.
- Incorporate a shaded area in the run to provide relief on hot days.
- Regularly clean the coop and run to maintain a healthy environment.
- Share your design and experiences with local homesteading groups for inspiration.
- Document your journey to encourage others interested in starting their own chicken coops.
- Why it works: The pitched roof gives room under the peak for air, and the layout is easy to copy from plans.
- What keepers say: The most common regret is a coop that is too small. Build for a few more hens than you plan to keep, since most flocks grow.
- Watch out for: Short roofs that make cleaning a crouching job. Add a large clean-out door at floor level.
- Why it works: You stand upright to clean, collect eggs and catch a sick hen.
- What keepers say: The real saving is time. Daily chores and deep cleans both go faster.
- Watch out for: Floor rot. Set the building on a gravel pad or on concrete blocks so the bottom boards never sit in damp soil.
- Why it works: The raised floor keeps the coop dry, and the shaded space beneath gives the hens a dust-bath spot. A metal roof sheds water and snow quickly.
- What keepers say: Modern coops stay cleaner, since droppings can fall through a slatted or wire section. They also tend to last longer than coops built close to the ground.
- Watch out for: Summer heat under a metal roof. Add vents at the top of the walls, and consider a layer of insulation or a reflective underlayment.
- Why it works: The hens get fresh grass every few days, and the droppings fertilise the lawn evenly. A first-time builder can finish one in a weekend with basic tools.
- What keepers say: Moving it each day matters. Left in one place, the ground turns to bare dirt quickly.
- Watch out for: Small size and weight. It suits a few hens, and a tractor is not enough in winter or in areas with heavy snow. Fit solid wheels or handles so one person can shift it.
- Why it works: The cost is low, and pallet boards are already cut to a useful size.
- What keepers say: The work is slower than it looks. Taking pallets apart without splitting the boards takes patience, and you will need to fill gaps and rough edges.
- Watch out for: Chemical treatment. Pallets stamped “HT” are heat treated and generally considered safe. Avoid any pallet stamped “MB”, which means methyl bromide, and any that smell of chemicals or have oil stains.
- Count your hens, then add a few for later.
- Decide how much cleaning you are willing to do. A walk-in door saves effort every day.
- Pick the style that fits your yard and your skills.
- Choose exterior-grade plywood, cedar or pine, and seal all outside surfaces.
- Add ventilation near the roof, predator-proof wire and a secure latch on every door.
- Roosts: Set the roosts 18 to 24 inches off the floor, spaced about a foot apart.
- Nest boxes: Run a bank of 16 to 18 boxes along one wall, mounted at least 2 feet off the floor and away from the roosts. Add exterior egg doors.
- Doors: Include a full-height door, plus two or three pop doors so birds do not queue.
- Cost and effort: One roof and one set of walls keep the cost lower. One building is also simpler to heat and light.
- Downside: Disease can spread through the whole flock, and one hen that bullies others affects all 70.
- Why it works: You can split the flock by age or breed. You can isolate a sick group, and you can rest one run while the other is in use.
- Pecking order: Two groups of 35 are easier to manage than one group of 70.
- Cost: More walls and doors mean a higher build cost.
- Tip: Share a single feed and egg room between the two coops.
- Why it works: Ready-made walls and a roof cut build time. A sturdy floor helps with rodents.
- What to change: Add vents high on the walls and a gable vent. Sheds hold moisture and ammonia easily, and a damp or ammonia-smelling coop means the ventilation is not enough.
- Floor: Use deep litter. A concrete floor or a block base also helps against digging predators.
- Check first: Local rules may require a permit for a structure of this size.
- Why it works: Hens get fresh grass, and manure spreads over the ground instead of piling up.
- Limits: Mobile coops need a tractor or a strong trailer, and heavy snow makes winter moving hard.
- Predators: Lock birds in every night, and use fencing that predators cannot dig under.
- Ventilation: Place vents high, away from the roosts and away from prevailing winds. The south or east side is usually best. Add insulation and a vapor barrier in cold climates so moisture does not collect on walls.
- Litter: Use deep litter or a droppings board under the roosts. At this flock size, manure is a daily job.
- Predators: Cover windows and vents with half-inch hardware cloth. Bury fencing at least 12 inches deep, or lay an outward skirt. Roof the run with mesh against hawks and owls.
- Water: Put some waterers in the run to keep the coop drier.
- Lighting and power: A single outdoor outlet and a light on a timer save work in winter.
- Rules: Check local rules on flock size, roosters, setbacks and building permits before you buy lumber.
- Pick Design 1 if you have one flat site and want the lowest cost.
- Pick Design 2 if you want to separate groups or reduce disease risk.
- Pick Design 3 if you already own a shed.
- Pick Design 4 if you have pasture and want to cut cleaning work.


20. Homesteading Project 20: Functional Chicken Coop With Ramp


This functional chicken coop design features a ramp and a small run, perfect for a suburban backyard with a nearby vegetable patch. With a few hens observed dust bathing in the sunlight, this setup emphasizes the importance of providing space for natural behaviors.
Building this coop requires basic construction materials and tools, making it an achievable project for many.
A size of 5’x7’ is suitable for 4-5 hens, allowing them enough space to thrive. The ramp provides easy access to the coop, while the run allows your chickens to enjoy the outdoors safely.
Ensure proper ventilation and natural light in the coop to promote a healthy environment.
Regularly check the condition of the ramp and run to ensure safety for your flock. This practical design not only meets your chickens’ needs but also enhances the functionality of your backyard.
Some More Wooden Chicken Coop Design Ideas
A wooden chicken coop design suits almost any yard. Wood is easy to cut, easy to repair and warm in winter. It also takes paint and sealer well.
The five designs below cover traditional, modern and do-it-yourself builds. Each one lists who it suits and what keepers say after living with it.
Whatever design you pick, plan about 3 to 4 square feet of coop floor and about 10 square feet of run for each hen.
Cover every opening with half-inch hardware cloth, because wood alone does not stop a raccoon.
| Design | Style | Best for | Skill level |
|---|---|---|---|
| Classic gabled hen house | Traditional | 4 to 8 hens | Medium |
| Walk-in barn-style coop | Traditional | 8 to 20 hens | Medium to high |
| Raised modern coop with metal roof | Modern | 4 to 10 hens | Medium |
| A-frame chicken tractor | DIY | 2 to 6 hens | Easy |
| Pallet-wood coop | DIY | 3 to 6 hens | Easy to medium |
Traditional Wooden Chicken Coop Designs
Lets have a look.
1. Classic Gabled Hen House With an Attached Run
This is the little house with a pitched roof, a ramp, a pop door and outside nest boxes. It is the shape most people think.
Keepers like it because the roof sheds rain, the nest boxes open from outside, and the run attaches without extra work.
2. Walk-in Barn-Style Coop
A barn-style coop is a small shed for chickens. It has a full-height door, a loft or roosts on one side and a window or vent high on the wall.
It costs more and takes longer, but keepers who build one rarely go back.
Modern Wooden Chicken Coop Designs
Here are more…
3. Raised Modern Coop With a Metal Roof
A modern coop has clean lines, a single-slope metal roof and a floor lifted 2 to 3 feet off the ground.
It often has a painted or stained finish, with a covered run underneath. It looks tidy in a front or side yard, which helps if neighbours are watching.
DIY Wooden Chicken Coop Designs
Don’t miss it also.
4. A-Frame Chicken Tractor
A chicken tractor is a light wooden frame on skids or wheels that you move across the lawn.
The A-frame shape is one of the simplest, because the two sloped sides act as both walls and roof.
5. Pallet-Wood Coop
A pallet coop uses reclaimed wooden pallets for the frame and walls.
It is popular because the wood is often free, and the slats make good siding.
How to Choose the Right Wooden Design
Chicken Coop Ideas for 70 Chickens
A flock of 70 is no longer a backyard hobby. It is a small farm that needs a real building, daily water hauling and a plan for manure.
The right chicken coop ideas for 70 chickens start with the numbers, because space, roosts, nests and water all scale up with the flock.
This section sets the capacity targets and then gives four designs that fit them.
Capacity Targets for 70 Chickens
These figures use extension guidance for laying hens. Treat them as minimums, because more space is always better.
| Requirement | Rule per bird | Total for 70 chickens |
|---|---|---|
| Coop floor space | 3 to 4 sq ft | 210 to 280 sq ft |
| Outdoor run | 10 sq ft | 700 sq ft |
| Roost length | 8 to 10 in | about 47 to 58 ft |
| Nest boxes | 1 per 4 to 5 hens | 14 to 18 boxes, 12 by 12 in each |
| Feeder space | 3 to 4 in | about 18 to 23 ft |
| Nipple drinkers | 1 per 6 to 8 birds | 9 to 12 nipples |
Plan on the high end. Keepers of large flocks on forums often suggest 12 to 16 inches of roost per bird and about 1 square foot of vent per bird. With over 25 birds, extension guidance says to use separate feeder areas.
Water use is large. My estimate is roughly 8 to 9 gallons a day for 70 hens in mild weather, and more in heat. Plan for a hose or a water line, not a bucket.
Design 1: One Large Single Coop With a Big Run
Build one house about 12 by 20 feet, which gives 240 square feet, or about 3.4 square feet per hen. Attach a covered run of about 20 by 40 feet, which is 800 square feet.
Design 2: Two Smaller Coops Side by Side
Build two 12 by 12 foot coops, 288 square feet in total, each holding 35 hens. Give each coop its own run of about 20 by 20 feet.
Design 3: Shed or Small Barn Conversion
A 16 by 16 foot shed gives 256 square feet, or about 3.7 square feet per hen. Convert it with windows, roosts, nest boxes and a pop door.
Design 4: Mobile Coops on Pasture
Split the flock into two or three mobile coops, each housing about 25 to 35 hens. Move them across the pasture every few days, and use electrified poultry netting for the run.
Building Details That Matter at This Scale
Which Design Should You Pick?
Lets Close The Topic Today!
So, building a chicken coop is a practical and rewarding project that can enhance your backyard homestead.
Remember, success in homesteading doesn’t require fancy equipment or elaborate structures; starting small with achievable projects can lead to significant rewards.
Follow the process, document your journey, and share your experiences with others to inspire a community of like-minded individuals.
Happy homesteading!